If you have ever looked at #cakeguts on instagram and thought to yourself "how do they get such even layers?" then this blog post is essential reading for you.
#cakeguts sounds like something really gross, but it is far from it! Sometimes the inside of a cake can be just as attractive as the outside (well, kinda) When you can see perfectly levelled layers of cake with oozy fillings cushioned between them, it is a joy to behold. You may think that getting such perfect layers requires an offering to the cake gods but with one of the tools below, even mere mortals can do it. I don't think that anyone will turn away a piece of delicious cake just because the layers are a bit uneven, but, well, there's nothing wrong in striving for perfection ;-) Look at these beauties...
The cheapest and most low tech way to torte a cake is to use a ruler. This method gives fairly accurate results, and if you are patient, it'll be great. But it can take a long time to do, requires a steady hand and practise to get great results every time. If you make more than one cake a year, or find yourself impatient to get onto the fun part of decorating, it may be worth investing in one of the levellers below instead.
Check out Yolanda Gampp's knife and ruler method here if you'd like to give it go: https://www.youtube.com/watch?v=2b3fFem7bts
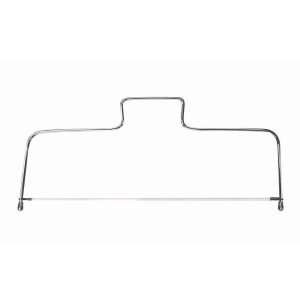
This simple and inexpensive tool is great for beginners or those who don't want to invest too much in cake tools. There are a couple of tricks involved to ensure that the leveller works properly, otherwise you might get a bit frustrated and throw it in the back of the kitchen drawer for it to never see the light of day again!
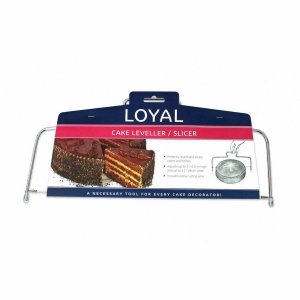
This tutorial gives great visual advice on how to use a wire leveller: https://www.youtube.com/watch?v=RE4w15Mipm0
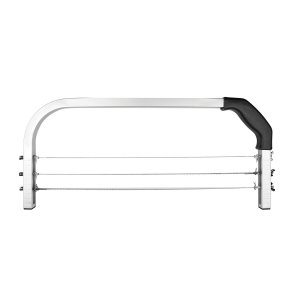
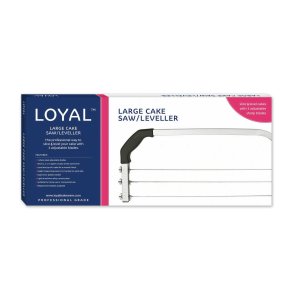
This is the next level in, well, levellers. It features 3 blades, meaning you can cut up to three layers of cake at a time. The sides of the saw have centimetres marked on them, which makes it easy to see if the blades are level and, if you are good at maths (ahem! Don't look at me!) you can make sure the blades are all equidistant to each other too so you can cut three even layers at once. The nuts on the side make it easier to loosen the blades and move them when needed. Similar to the tips for the wire leveller, make sure your cake is defrosted and on a level surface, and don't let the saw tip as you move it - keep it perpendicular to the cake for the best results.
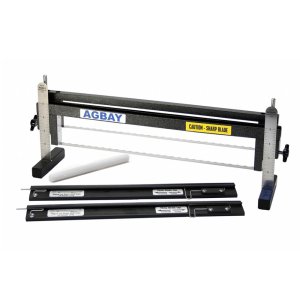
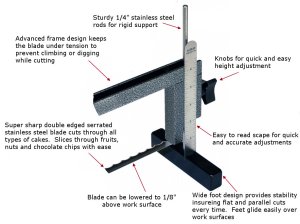
For perfect layers every time, and with such ease, you cannot go past an Agbay. They are the creme de la creme of levellers. If you have a business and / or are torting cakes left, right and centre, you are going to be blown away by the Agbay. The Agbay was designed and made by wife and husband team Maureen and Tony Agbay in the US. Maureen was a professional cake decorator and sick of cake levellers breaking down on her and cutting the cakes all wonkily, so she enlisted the help of her product design engineer husband to make her something better. And boy did he make something better! The Abgay features a sturdy, razor sharp blade, which is easy to adjust and won't lose its tension. It also has wide feet so the leveller can't tip as you cut. It comes with a safety cover for the blade when it's not in use. It is solidly built and is a serious piece of kit! Once you try an Agbay you won't look back, I promise!
We stock a couple of different Agbays:

This is a mesmerising video of the Agbay in action!
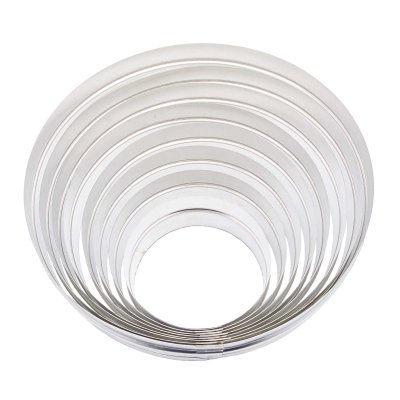
If you have the layers perfect, then you might as well go the whole hog and get the edges of your cake perfect too. Forget spending half an hour trimming around your cakes so they are nice and even, and invest in a cake trim ring. They are 1/2 an inch smaller than the cake boards, which makes the perfect gap to fill with buttercream or ganache, as you'll have 1/4 of an inch gap all the way around. They are solidly built and won't warp or lose their shape.
Look how much I love mine!