So you've bought the checkerboard pans and now trying to work out where to start. The best thing with the checkerboard pan is that it is a fun project to do with the kids. Heather has made quite a few now and always recommends to get the kids involved in choosing the colours. If you're game enough, why don't you give the kids a few Americolor Gels and they can mix a few together to get that unique colour combination! Making a minecraft cake, why not use a variety of greens and browns? Baby Shower cakes work well with soft pinks or sky blue shades.
For quite some time the checkerboard pan set only came in a set of Round pans. Recently Wilton have released an 8" square pan set. The square pan set definately suits a minecraft cake.
Heather highly recommends the Bakels Buttacake Mix. Its thick batter consistency means the separate batter colours don’t run together when you remove the plastic insert ring prior to baking. The buttercake batter colours really well when using Americolor Soft Gel Pastes. The best thing is, you don’t have to add very much which makes them really economical to use.
One and a half bags (1.5kg) of the buttacake mix is the perfect quantity for this project. Lollipop Cake Supplies sells Bakels Buttercake in 1kg bags as well as in bulk 15kg bags. Using a Kitchen Aid, this amount of cake batter fits in the standard bowl. If you are using the square checkerboard pan set, you will require 2kg of Buttacake mix.
Adding flavour to the cake can be done when mixing the batter. Baking emulsions work well as they are water based, the flavour is not baked out of the mix in the oven. Oil flavours tend to lose their intensity once the cake is baked. A teaspoon or two of emulsion is enough. It you are inclined, a different flavour per colour can create an interesting mix for the tastebuds!
Always give the pans a quick spray with Bakels Sprink before you fill them with the batter. If you have never used Bakels Sprink before, you NEED to get yourself some! Bakels Sprink is a releasing agent which stops your cake from sticking to the cake pan. No need to line the tin with baking paper, thus saving time and money!
Divide the batter into three even amounts. Add the desired amount of colour to your batter and hand mix the colour into the batter. Remember, add small amounts at a time as it is easier to add more colour as opposed to making more batter due to making the wrong colour.
If you choose to colour the batter in your mixer, include the colour into your mixing time to ensure that you do not over mix the batter.
Whilst you can simply spoon the batter into the guide ring, it gets quite messy and often the colours will mix and the finished result will not have clean lines. Heather recommends to use three disposable piping bags. These are available individually, in packs of 10 and rolls of 100. Piping the mixture into the separate sections makes the job so much easier than trying to spoon the batter in. You don’t need to use a piping tip or coupler, simply snip the end off the bag. 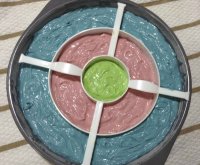
Always fill the middle of the ring first. The weight of the cake batter holds the dividing ring still for you while you pipe in the rest!
Alternate the batter across the three pans. Once one pan is filled, remove the batter divider and place it in the next pan. By doing this, it ensures that you complete the pattern correctly and your batter will be enough to complete the whole cake. When the pans are full you should have the following;
Wash the dividing ring before placing in the next pan to ensure that the colours remain separated. The dividing ring is NOT oven save and it must be removed from the pan before baking the cakes. The included booklet has detailed instructions on how to complete this step.
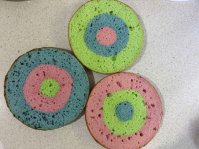
Once the cakes have baked and cooled, trim the dome off the top of each cake. Heather loves the simplicity of the Loyal Cake Leveller. As these cakes are only 8" in diameter, the loyal cake leveller is ideal. For larger projects it is worth investing in the Loyal Three Blade Cake Saw. The cake saw can cut cakes up to 16" in diameter!
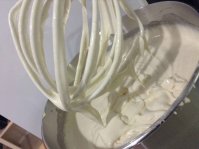
Spread a little buttercream between the cakes, to join the three layers together, and then a thin crumb coat on the outside before your finished layer. The crumb coat on the outside of the cakes locks in the crumbs and stops the crumbs from spreading into your finished buttercream coat.
You can finish the cake however you like. Maybe a smooth buttercream finish or cover in fondant. Heather is a fan of piping and thinks that this simple ‘petal’ design looks great, is really effective and pretty quick and easy to do. (Multiple colours will take a little longer, however will add to the WOW factor!)
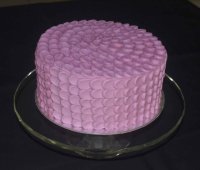
Using a Loyal Round Piping Tip #12, pipe six dots up the side of the cake, starting at the base and finishing in line with the top of the cake. Using the Loyal 4" Angled Spatula, ‘smear’ each dot, forming a tail. Once you have finished that row, pipe another six dots onto the tails of the previous row and repeated all the way around the cake. Once you have the side completed, start work on the top of the cake.
An instruction sheet comes with the pan set, but here are a few other tips that might be helpful:
Remember, practice makes perfect, get the kids involved and enjoy the look of surprise on everyones face as the cake is cut!
Happy Baking :)